I was playing around with my Facebook profile today I found out the date I created the account and I was like oh and I couldn’t believe my eyes! The account was opened almost 14 years ago.
Although since I created my first Facebook account I have created many more, some for personal use and some for businesses.
To know how to check Facebook years or when you created your Facebook account you only need to play around with your Facebook profile and you will be surprised that the account was open not just months but years.
So, before I dive into the tutorial let me first ask; when was your Facebook account created and how old is your Facebook account? My first account was created a decade ago with about 5,000 Facebook friends and 300+ Facebook followers. Did you just say wow?
Let’s just have fun with this post about how to check how old a Facebook account is and when your Facebook account was opened.
To make it fun, share this post with your friends to see who is old among you guys on Facebook.
And many more to discuss. So, be surreal that you follow the article to the end to unravel how to see when you created your Facebook account.
How to Check When Your Facebook Account was Created
If you are reading this post you probably want to check when your Facebook account was created to know how long you have been with Facebook as a patriotic user.
1. Open your browser on mobile or on your computer or on your Facebook app and log in to your Facebook account
2. On the Facebook app click on the three horizontal lines and then click on your view profile
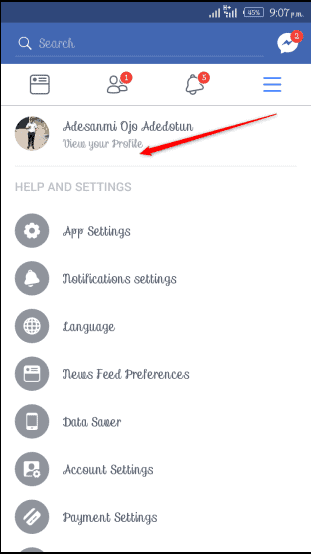
3. Click on edit profile under your Facebook profile picture
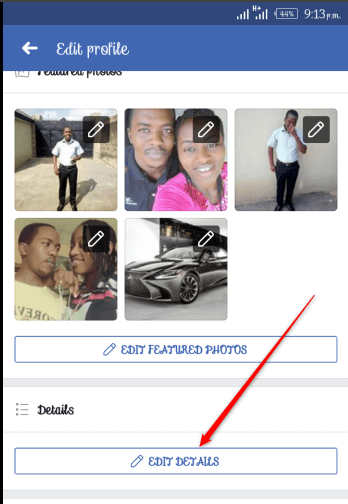
4. Click on edit details and scroll down the page to see when you joined Facebook.
In my case, I joined Facebook in December 2009 which few months down a decade. I can’t believe I have spent almost a year rocking Facebook, the most popular social network on the planet earth.
How to Check Facebook Years on the Web
Follow the steps below If you want to check which year your Facebook account was created. You need to use the official Facebook portal to check which year you joined Facebook and how many years you have spent Facebooking.
- Go to web.facebook.com on your web browser.
- Login with the Facebook details whose years you want to check.
- Click on your “Profile icon” to the top right and choose “Settings & Privacy.”
- Choose “Settings” again under “Settings & Privacy.”
- Click “Privacy” and click “View” on “Access Facebook Information.”
- Click on “Personal Information” on the left under “Your Information.“
- Go to “Your Account Creation Date” to see when your Facebook account was created.
The steps above show how to check Facebook years on the Facebook website on your browser.
How to Check How Many Years Your Facebook Account is on App
Here is how to check how many years your Facebook account is on the official Facebook mobile app.
Android
- Open the “Facebook” app on your “Android” phone
- Tap on your “Profile” icon at the top right corner.
- Click on “Settings & privacy.”
- Tap on the “Settings” gear icon.
- Click on “Account Center.”
- Scroll down and tap “Your information and permissions.”
- Tap “Access your Facebook information.”
- Click on “Personal Information” under “Your Information.”
- You will see when your Facebook account was created in “Your Account Creation Date.”
iPhone
- Open the “Facebook” app on your “iPhone.”
- Tap on the “Menu” lines at the bottom right.
- Tap on “Settings” at the right corner.
- Tap “Accounts Center” under “Settings & privacy.”
- Go to “Account Settings” and click on “Your information and permissions.”
- Click on “Access your information.”
- Scroll down and tap “Personal information.”
- Check for “Your account creation date” under “Personal information.
How to Check Facebook Years on Facebook Lite
The Facebook Lite is another version of the Facebook app that works without a strong internet connection. It works like the normal Facebook though but with concise features.
iPhone and Android
- Launch the “Facebook Lite” app.
- Tap on the “three lines” at the top right.
- Scroll down and hit the “Settings & Privacy” menu.
- Select “Settings” from the menu.
- Hit “Accounts Center.”
- Click on “Your Information and Permissions” under “Account settings.”
- Tap “Access your information.”
- Scroll down and tap “Personal Information.”
- You will see your “Facebook Year” under “Personal Information
The process to check your Facebook year on Facebook Lite is similar to the approach on the official app.
How to Check When a Facebook Account was Created
You can check when your Facebook account was created using the Facebook welcome email that was sent to you for confirmation. When you sign up for an account on the website an email containing your verification link will be sent to you during registration for confirmation. If you can find this email you can use it to track when your Facebook account was created.
Meanwhile, this must be your Facebook primary email address. The first ever email that was linked to your Facebook account.
- Open your Email.
- Search for “Facebook”, Welcome to Facebook” or “Facebook Registration Confirmation” using the search box.
- Locate the oldest email and check the date it was sent to you.
This is the most reliable way to check when your Facebook account was created outside the Facebook website or application. However, if you have deleted the email you will likely not be able to use this approach.
How to Check When Your Facebook Account was Created Using Profile Picture
If you set up your Facebook profile on the first day by uploading your profile picture you can use it to check when your Facebook account was created. However, if you are not sure whether you uploaded a profile picture on the first then this will not give the exact day that your Facebook account was created but the exact date.
Web
- Go to web.facebook.com on your browser.
- Click on your “Facebook Name” at the top left to access your Facebook profile page.
- Click on “Photos.”
- Click on either “Photos of You” or “Your Photos.”
- Scroll down until you get to the last picture or photo.
- Click on the “Picture” to enable full screen.
- You will see the date the picture was uploaded to Facebook.
You can use this to track when your Facebook account was created.
How to Check Years of Facebook Accounts You Became Friends on Web
You can also keep track of when you became friends with someone on Facebook. So, here you will learn how to check years of Facebook accounts you became friends.
- Go to web.faceook.com and sign into your Facebook account.
- Click “Friends” on the left pane.
- Choose “All Friends” to reveal all your Facebook friends.
- Find and click on the name of your friend whose Facebook account creation years you want to know.
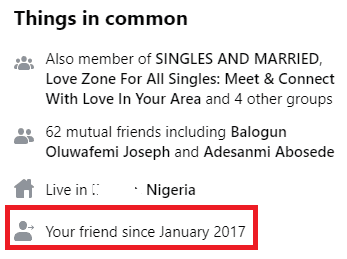
- Click on the “three dots” on the friend’s profile information navigation.
- Select “See Friendship” from the information that is displayed.
- Look closely in the “Things in Common” section and you will see the year you became friends.
This is straightforward enough to find out when you became friends with someone on Facebook on a desktop or via the official Facebook website.
How to Check When You Became a Friend on Facebook App
After learning how to check your Facebook account creation date you can also check when you became a friend with any of your Facebook friends.
- Open the Facebook mobile app.
- Click on the 4th icon on the navigation beside the Facebook marketplace or before the notifications bell.
- Click “See all Friends” under your Facebook feeds.

- Click on the name of the friend whose friendship information you want to know.

- Click on the 3 dots beside the messenger icon.
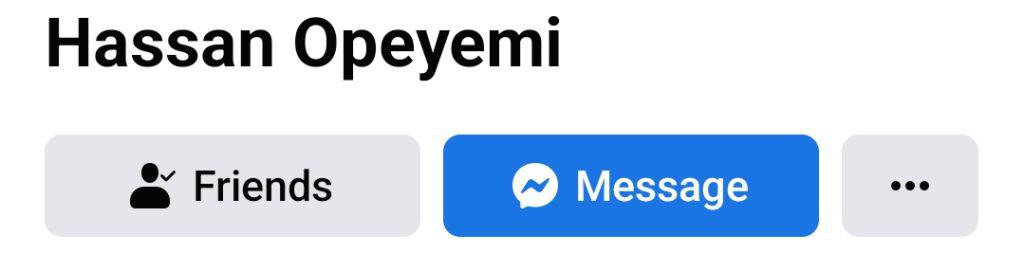
- Select “See Friendship” under “Profile Settings.”

- You will see when you guys become friends.

With this guide, you will not only learn how to check when a Facebook account was created. But, you will also get to know how to check when you become a friend with any of your Facebook friends.
When Did I Create My Facebook Account
I’ll reveal when I created my Facebook account below so that you can follow the same steps I use to know when I created my Facebook account to find out the date you created your Facebook account.
Launch the Facebook app >> Settings & Privacy >> Settings >> Profile Settings >> Access your Information >> Personal Information >>> Your account creation date.
That is how to find out when your Facebook account was created. Since Facebook has modified everything you need to play around with the profile settings to get when you create your Facebook account.
How to Check How Old a Facebook Account Is [Updated]
When I checked how old my Facebook was; I found out that my Facebook account age is 14 years old. So, here is how to check how old a Facebook account is.
- Sign in to your Facebook Account.
- Click on your “Facebook Profile” icon.
- Click on the “Settings & Privacy” gear icon.
- Choose “Profile Settings” under the “Settings & Privacy” option.
- Scroll down until you get to “Your Facebook Information” and select “Access Profile Information.”
- Scroll down to “Your Information” and click on “Personal Information.”
- You will see when your “Facebook Account was created” under “Profile Information.”
To find how old your Facebook account you then need to subtract your Facebook account creation date from the current date.
When Did I Create My Facebook Account
You can check when you created your Facebook account by following any of the steps we discussed above. We have showcased updated steps on the answer to your question “When did I create my Facebook account” either on your mobile phone or on the web.
Either way, you can find the exact year that your Facebook account was created. If you have an issue seeing the date or year that your Facebook account was created kindly leave a comment and we will be glad to improvise.
What about you? When was your Facebook account created? Yesterday or today or a decade ago? Let’s have fun via the comments. Tell us when you created your Facebook account.
When Did I Join Facebook
If you ever want to check out the year your Facebook account was created at least one of the methods highlighted above should work. It doesn’t matter whether you are using an iPhone, Android or web.
THANK VERY well done but they change things around if you email me I share the new way but your article is great
Nice and interesting information