Taking screenshots is the easiest way to archive any page on your Mac device. However, the downside is the excesses you must remove from the screenshots to make it professional and perfect. You need to crop out the unwanted part of the screenshot whether when it’s previewed or in your screenshots folder. So, in this article, we will discuss how to take a screenshot on Mac and how to crop a screenshot on Mac.
You can take a full screenshot on your Mac or only focus on a selected screen on your Mac computer using the command prompt. However, when you choose a selected area on your Mac to screenshot you may not need to crop out or trim unwanted parts from the screenshot but if you take a full screenshot, you will crop out the excess from the screenshot using your Mac’s inbuilt tool or a 3rd-party tool.
How to Take a Screenshot on Mac
There are a few ways to take a screenshot on Mac. All the methods are as good as the other. However, the fastest way to screenshot your Mac using a shortcut on your keyboard.
Recommended: How to a Screenshot on Laptops & Desktops
Method 1
You can use the following shortcut if you want to capture the entire screen of your Mac computer.
- Press “Shift + Command + 3”
Method 2
If you want to take a screenshot of a particular area on your Mac you can use the keyboard combination below.
- Press “Shift + Command + 4.”
Method 3
This method gives you the option to choose from. The Mac screenshot command below shows a panel with three options including the option to screenshot an entire screen, a window or a particular area of your screen.
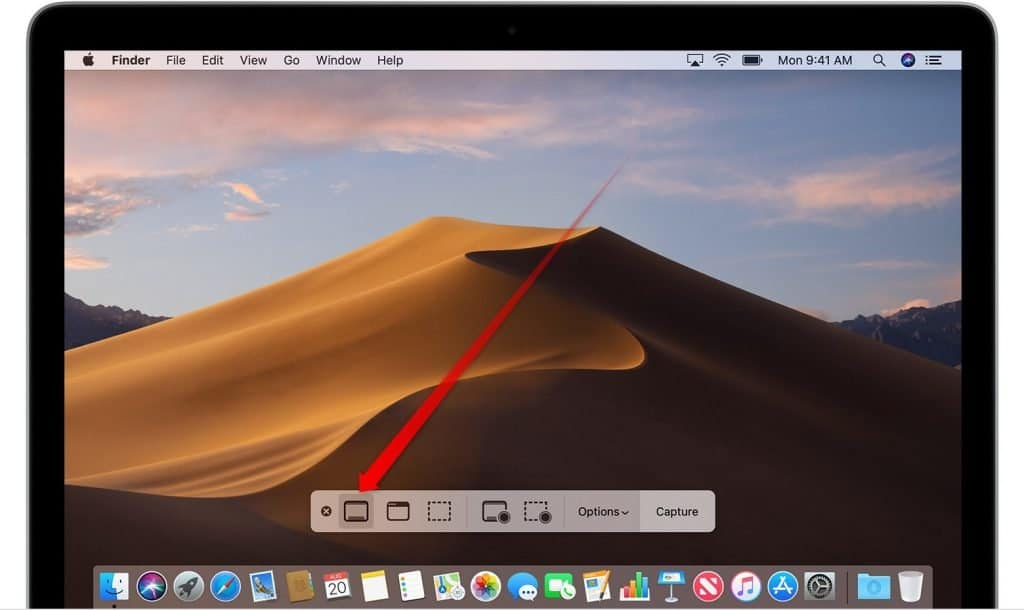
- Press “Shift + Command +5.”
How to Crop a Screenshot on Mac
You can crop a screenshot on your Mac using the inbuilt app called the “Photos app.” If you know how to use the photos app on your Mac you can use it to crop or trim your screenshot preview on your Mac computer.
By following the steps below you will know how to crop a screenshot on your Mac using the Photos app.
Note: You must save your screenshots on the photos app for easy accessibility.
- Click on the “Finder” icon on your Mac screen.
- Select “Applications” from the drop menu.
- Choose “File” and then “Import.”
- Open the “Screenshot” you want to edit by clicking on it twice and it will open in the “Photos App.”
- Click on “Edit” on the toolbar.
- Choose “Crop” when the edit options appear.
- Crop out the unwanted part of the screenshot for the best result.
- Click on “Save a Copy As” to save the edited or cropped screenshot. Both the screenshot and cropped version will be saved in the folder without any effect.
You can also send the cropped screenshot by clicking on the “Share” button and choosing where you want to forward your cropped screenshot to.
How to Take a Screenshot on Mac and Crop
The fastest approach to crop a screenshot on Mac is using the screenshot preview. Once the screenshot is taken you just need to click on the preview and crop out the unwanted part.
So, by following the steps below you will learn how to crop a screenshot from the preview on your Mac.
- Press “Shift + Command + 5” to take a screenshot on your Mac.
- You will see the command bar with options.
- The options here allow you to take a full screenshot, section or window on your Mac.
- You can also record your computer screen with this command.
- The “Menu” option allows you to choose where to save your screenshot.
- You need to decide whether you want to screenshot your entire screen, a particular area or a window. Once you have decided that you need to click on the “Capture” button to take the screenshot and save it to the predefined location.
How to Crop a Screenshot on Mac Preview
Here is also another way you can beckon on to crop a screenshot on your Mac.
- Double-click on the “Screenshot” to open it.
- Select “View” from the “Menu.”
- Choose “Show Markup Toolbar.”
- Click on the screenshot and drag the markup toolbar to select the area of the screenshot that you want to save.
- You will see the “Crop” icon once it’s selected.
- Click on the “Crop the Selection.”
Do not forget to delete the original screenshot once you have cropped out the unwanted part so that the screenshots will not build up to take up spaces on your Mac.
How to Take a Crop Screenshot on Mac
Apple offers a few methods to take a screenshot on your Mac and crop them. There are different methods with built-in shortcuts that you can utilize to take a screenshot on your Mac computer.
These shortcuts include the following.
- Full screenshot: Shift-Command-3
- Window: Shift-Command-4-Space bar
- Select screenshot: Shift-Command-4