In this article, you will learn do-it-yourself iPhone 6 screen replacement if your iPhone is battling with a broken screen, poor sensor due, a scratch screen that is not responding to calibration.
All smartphones are fragile and expensive. However, the iPhone is more fragile and can cost a fortune to buy the latest version like iPhone 6, iPhone 7, iPhone 8, and the new iPhone X.
To replace an iPhone screen can cost more than the quarter of the purchase price when you seek the service of a local vendor or engineer. You can even make an attempt to return it to the company where you bought it but the warranty doesn’t cover that.
This implies that you are responsible for fixing your iPhone damage when it falls accidentally. However, you may want to try this DIY guide to replace an iPhone screen when it breaks.
You have to be very conscious when handling your iPhone as your iPhone 6 can lose all it compartment in a single fall beyond replacement including its calibration and earn your iPhone a broken screen that you need to change.
iPhone 6 Screen issue
The screen is the most fragile part of smartphones as it can go extinction in a single drop and cost some bulk to repair. However, before we proceed with this guide on how to replace an iPhone 6 broken screen, here are some of the common screen issues you like need to fix first before you dismantle your iPhone and go for a replacement.
Note: If you are so sure that the issue your iPhone is having is a bad screen that needs a replacement you can skip this section and move down to iPhone 6 screen replacement section.
1. First, clean your phone screen with a soft cloth or a tissue paper. If after this cleaning, the calibration is working fine and you can see clearly the screen of your iPhone, you may not need to proceed further to replacing the iPhone screen.
However, if the reverse is the case, there is nothing bad in cleaning your iPhone before replacing the screen.
2. In a case where there is nothing wrong with your iPhone screen compatible and it stops calibrating all of a sudden, the glitch may be because of the software compartment, so, there won’t be a reason to replace your iPhone screen when you fix the software problem.
Now that the problem is not a hardware problem and the phone isn’t triggered touchscreen issues, random flickering, and home button malfunctioning.
What you need to do to fix this is to update your iPhone 6 software to the latest version. If your iPhone OS current version is iOS 11, your iPhone may be having a glitching and malfunctioning. You need to upgrade to iOS 12 and now that iOS 13 is on the lookout, upgrading to the latest iOS 13 could help fix all iOS issue including the security bugs.
After the software solution above, if your iPhone 6 is still misbehaving, then, you need to check your configuration settings.
iPhone 6 Display Configuration
If you configure your iPhone 6 wrongly it can affect the phone performance and functions. Some configuration may affect your phone internally and cause hardware malfunctions.
However, where this happens, you can do the following to get your iPhone device working fine once again.
Restart your iPhone

This is the quickest approach to take when your iPhone is hanging or the calibration is not working fine. With just hitting the restart button your iPhone can come back to normal.
So, before you go ahead to dismantle your phone screen and go for a replacement, take your time to restart it first to see if it fixes it.
Check your iPhone Storage Status
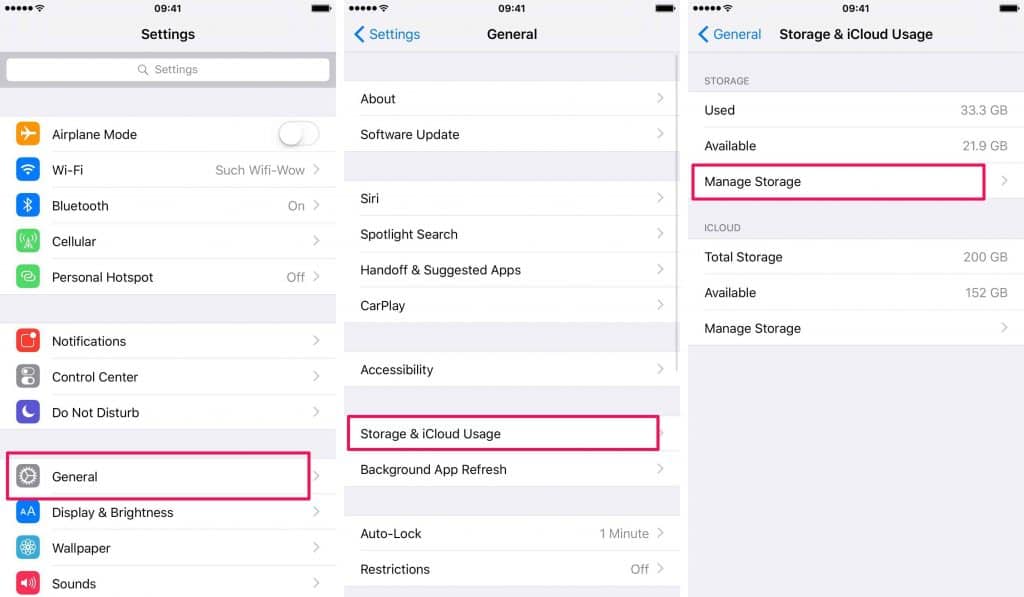
This is another glitch that can slow down your phone performance and from responding in time. If you are running of out storage capacity your phone may take longer than expected time to respond to calibration.
When its performance reduced due to slow storage capacity you may think that the phone screen is damaged. So, before you conclude on whether the screen replacement is necessary or not, make sure your phone memory isn’t contributing to the slow performance or screen touch not responding to calibrations.
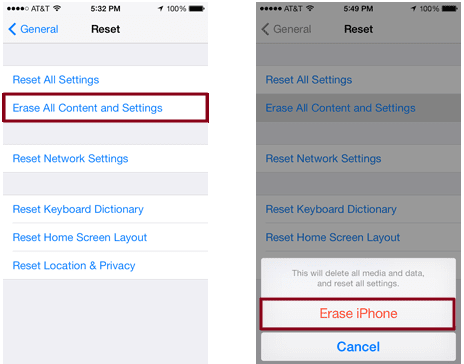
Do a factory Reset
Your iPhone screen is very fragile so don’t be in a hurry to change it when you notice a flop. Rather take some personal scrutiny to make sure that things are working fine.
However, if after you have restarted your iPhone and check your phone memory status and still discover that the calibration is still hanging, you may need to take this last does of resetting your iPhone.
However, before you take the decision to do a factory reset of your iPhone, endeavor to do a backup of your files to iTunes or iCloud so you can restore your backup files later.
If after the above steps nothing works then it’s far beyond the software glitch. However, you need to proceed with this DIY iPhone 6 screen replacement we are you will learn here.
iPhone 6 Screen Replacement
Here is a DIY iPhone screen replacement guide. However, before you proceed to dismantle your iPhone screen and replace it with the new screen, kindly make sure the following resources are available.
1. An iPhone-specific toolkit
This toolkit might include the following. And if it doesn’t, you have to get it separately to be able to carry out this task.
- Suction Cup
- Plastic Pick
- Small Crosshead Screwdriver
- 5-Star Pentalobe Screwdriver
- Black Plastic Spudger
- ESD – Safe Tweezers
- Protective Eyewear (Just in case, safety always comes first)
2. Replacement iPhone 6 LCD screen
When you are getting the new replacement iPhone 6 LCD screen, make sure it doesn’t come with the home button.
3. Cost of getting the above stuff
This won’t cost much as hiring an engineer to help you fix it. However, getting the entire iPhone toolkits and the replacement iPhone 6 LCD screen may cost as roughly $120 – $130.
After you get everything mentioned above ready, follow the guide below to remove your iPhone screen and replace it.
How to Remove iPhone Screen

So, we start first with removing your iPhone screen from the body first. Please, follow this guide accordingly if you are ready to do it yourself and if you don’t get the mind, DO NOT TRY THIS.
1. Unscrewing the Pentalobe Screws
Firstly, you have to unscrew the 3.6 mm-long Pentalobe screws that are very close to the lighting connector.
Proceed to clear the packing tape that covers the iPhone display until the whole face is covered using the overlapping strips.
The above overlapping strips are important if your iPhone casing is cracked due to the fall to broken the screen to prevent it from cracking.
2. Light the Display Screen
After you have unscrewed the 3.6 mm-long Pentalobe screws, place your suction cup above your iPhone home button and apply a little force to make sure the suction cup is firmly sealed.
Now, while the suction cup has been sealed, hold the back of the phone to your hand and pull up the screen display with the suction cup.
While pulling the display. using the opening plastic tool, you may need a helping hand here, try to pry the back case downward from the other back where the suction cup holds while applying a uniform force.
3. Open your iPhone
Now, it is time to open your iPhone. You need to release the vacuum seal on the suction cup by pulling the plastic nub. At this juncture, start to remove the display assembly.
Now, gently remove the display and rest it again a vertical object like placing the display against a wall vertically.
4. Remove your iPhone Battery
Next, after you have successfully dismantled your iPhone display is to disconnect and remove your iPhone battery panel.
How do you do this?
Remove the 2.2 mm Phillip screw and the 3.2 mm Philip Screw from your iPhone battery connector and remove the battery panel bracket connected to your iPhone.
Now, once you have disconnected your iPhone battery from the sucket it connected to, take the plastic opening tool and remove the battery connector from its socket.
Please remove the battery gently from the socket to avoid damage on the battery compartment and to also avoid the extra cost of buying a new battery.
5. Remove Screws from the Front Assembly
To do this, you have to remove the three screws, namely: 1.2 mm screws, the 1.7 mm screw, and the 3.1 mm screw. After you successfully unscrewed these screws, be sure to note the Pentalobe where you removed them as to be able to replace them to the appropriate location when you want to replace it.
6. Dismantle Inner Parts
Now, it’s time to dismantle the iPhone components. Grab a spudger and remove the front camera and the phone sensor cable connector. After that, remove the home button connector to the panel using the spudger. Be conscious of the phone board so as not to damage it.
Lastly, grab the spudger to remove the display data cable connector. With the help of the flat end of the spudger disconnect the digitizer cable connector.
When you are fixing the digitizer cable connector back, do not press it at the center rather press it at the end and then at the opposite end.
7. Remove the Home Button
Now, we need to gently remove the home button from the front panel following the removal of the inner parts.
First, remove the front assembly from the front end and unscrew the two 1.9 mm Phillips screws that hold the home button firm to the phone panel.
Proceed to use the spudger to disconnect the home button cable connector by gently pulling the home button from the top corner until it removes from the panel.
Now, take the home button from the body of the iPhone with the help of the spudger and then fix the spudger beneath the home button cable from the adhesive to remove all the adhesive it in.
Once the whole of the adhesive is removed with the help of the spudger you can gently disconnect the home button cable from the connector.
Now, before you proceed to start the assembly, remove all the glass shards you see on the home button carefully.
8. Couple the Components Back
Going back all the way to where we are coming from to the iPhone 6 screen replacement. You have to follow the whole procedures described above and start to assemble the compartment back as you removed or disconnect them from their appropriate part.
However, make sure you apply adhesive to where necessary and don’t make a mistake. After that, for a firm result, apply heat to the portion for a couple of seconds when you are replacing the iPhone LCD casing and fixing back the home button.
Likely Problems After Assemblage
If you failed to follow the explained procedures above your iPhone will run into problems. And this might be worse than the screen issue it had in the first place.
Therefore, you firstly need to make sure you that all the screws were replaced back to the appropriate position and are firmly fixed.
However, don’t take chances of fixing and don’t be in a hurry. However, after the screen replacement and things ain’t working fine yet, then, it may be a software problem as suggested initially.
In the same like mind, if after the proper replacement, your iPhone is not charging, check whether the charging port is not blocked by any shady object and that the USB charging port is connected back to where it’s removed.
After you see that everything is working fine as expected, go back to restore your iTunes back.
Finally, your iPhone screen is replaced successfully and you should be good with your phone. However, if the touchscreen is still behaving funny are the screen replacement, it’s definitely not a hardware problem, rather, an issue with your phone software.
However, if not software, then, you have to redo it again